Woocommerce authorize.net needs integration with Authorize.Net to ensure your online store is secure and allows for a robust payment processing system. Setting up authorize.net on Woocommerce means that you can now accept eChecks and credit cards.
It also helps your clients save their payment details on your site for convenience and easy checkouts.
This post takes you through a simple, step-by-step process to set up authorize.net on your Woocommerce platform.

Setup Authorize.net on Woocommerce
Getting your website and Authorize.net working together isn’t as hard as you might think. Just follow these steps and you’ll be ready to start taking payments.
Step 1: Getting Started
Start by downloading the Authorize.Net plugin from Woocommerce. This means you need to connect Authorize.Net plugin to your account.
Download the required plugin, install and activate it on your e-store.
Once you’re done, navigate to Woocommerce, Settings, and Click on the Payments button.
After that, toggle Authorize.Net Credit Card to turn it on, then tap Manage.
Next, click Enable this Gateway and Card Verification (CSC). Right under this, you’ll find Transaction Type. Click the downward arrow and choose Charge. Locate Tokenization and also click on this checkbox to allow your customers to save their payment details securely.
Move to Environment and click the downward arrow, then choose Production.
Step 2: Get Authorize.Net API Keys
Next, proceed to get your Authorize.Net API Keys.
To get your account keys, you must login to Authorize.Net.
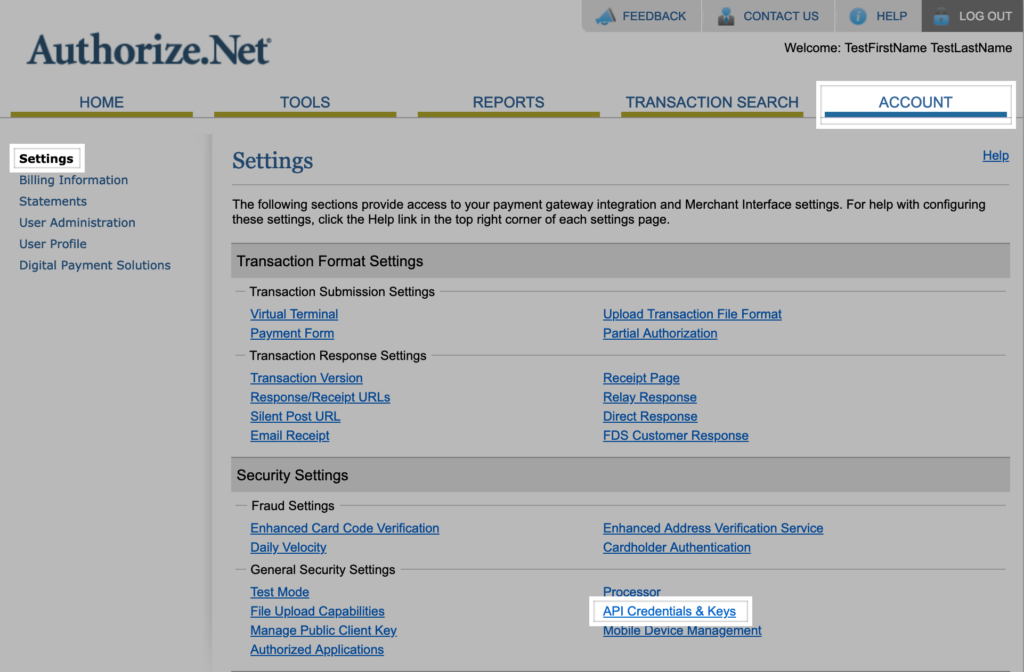
After logging in, navigate to Account, then API credentials & Keys. Here, you should be able to access your account keys.
Check your API Login ID and copy the details. Open your Woocommerce page and paste the copied elements.
Under API Login ID, you’ll find the API Transaction key. Copy these details and paste them into your Woocommerce page again.
Lastly, copy the Current Signature Key from Authorize.Net and paste it to Woocommerce API Signature Key.
Note: If you haven’t used the Authorize.Net Transaction key for a long time, you might have to regenerate a new key.
Scroll down to the bottom of your Woocommerce page and save your details.
That’s it! The next thing you need to do is to confirm that everything is working accordingly.
Step 3: Test Authorize.Net
Confirm that Authorize.Net is working on your Woocommerce store by performing a live transaction.
Set the value of a product to $1 and purchase it using your credit card. Once you establish whether Authorize.Net is working, you can reset the product’s price.
Pro Tip: If you can’t locate the Authorize.Net payment option, try clearing your browser cache. Confirm that you’re using the right WooCommerce Authorize.net plugin from Woocommerce.
To continue testing Authorize.Net, you can open a sandbox account using the following steps.
Setup Authorize.Net Sandbox Account
Of course, you want to be sure that orders on your Woocommerce store are working as required. A sandbox account can help you to perform these tests. Here’s what you need to do to set up this account real quick.
Step 1: Enable Test Mode Gateway in Woocommerce
Log in to your Woocommerce page, navigate to Settings, Payments, and click on Authorize.Net.
Confirm that the gateway is enabled.
Scroll to Environment and switch from Production to Test.
Save the changes you’ve just made.
Step 2: Setup Your Sandbox Account
Sign up with your account details to create your Sandbox Account.
It’s worth noting that the sandbox account works like the actual production environment. The only difference is that no real card processing takes place. Sandbox simulates connections, but there are no actual card payments.
Fill out the required information to create your Sandbox Account.
Next, copy your API keys so you can use them in the next step.
Step 3: Paste Your API Keys
Paste the API Keys you created to your Woocommerce platform and save the changes.
From here, the sandbox account created will enable you to perform test transactions on your online store.
Step 4: Test Transactions on Your Woocommerce Store
You need to test how a customer would interact with your Woocommerce store when making a purchase.
Go through the buying process and add a product or two to your cart. Continue to the checkout process and see what happens.
If there’s an error testing the front end of your store, confirm that the sandbox account is Live and not in Test mode.
Performing several tests will help to ensure that everything works as required. From this point, you should be able to accept credit cards using Authorize.Net. You can make a few tweaks to ensure you personalize your checkout process.
For instance, you can customize your credit card settings, eCheck settings, Webook, and order management.
Looking for a payment processing company with top-notch benefits? Look no further! Contact us now for a merchant account set-up with FREE equipment, FREE payment gateway, and cash discount options.
Alternative Plugins to Use to Setup Authorize.net on Woocommerce
While it’s recommended to use the official Woocommerce extension to set up Authorize.net, there are other plugins that can help you complete the setup process. It’s worth noting that using the Woocommerce official plugin is more manageable, and it comes with many features:
- Processing automatic refunds
- Keeping your clients within your site during the buying process
- Accepting all major debit and credit card types and eChecks
- Customers can save payment methods
- Customizable confirmation messages
Here are alternative Authorize.net plugins.
Authorize.net Payment Terminal
The Authorize.net Payment Terminal plugin also provides a simplified approach to integrating Authroize.net on your Woocommerce store. It allows customers to make payments by adding the price manually or pre-defining the payment service.
An exciting feature of this plugin is that it allows for recurring billing, which is quite essential if you’re running a business that requires recurring subscriptions.
ELEX Authorize.net Payment Gateway
ELEX Authorize.net Payment Gateway is also a great alternative that can help you install Authorize.Net on your site. In fact, if you’re starting out, this plugin comes highly recommended since it allows for easy configuration.
The advantage of ELEX Authorize.net is that clients remain on your website during the entire checkout process. This provides much-needed convenience when shopping online. Plus, a business owner can handle refunds and record payments with just a click with this plugin.
YITH WooCommerce Authorize.net
The YITH WooCommerce Authorize.net plugin comes in two modes: redirect your customers to the payment gateway website or allow them to complete the checkout without leaving your site. The plugin also allows for eCheck payments.
WooCommerce Advanced Integration Pro
WooCommerce Advanced Integration Pro is also relatively easy to use and integrates Authorize.net on your store. Clients don’t have to go to other pages during checkouts, and the plugin ensures your store accepts payments from notable credit cards globally.
Benefits of Adding Authorize.net to Your Woocommerce Store
If you’re running an online business, having a reliable payment gateway is a must. Your payment gateway gives your customers the confidence they need when purchasing from your online store. It also gives them a reason to believe that your online store is safe, and they can leave their financial details without worrying.
Most individuals know about payment options like Stripe, Paypal, etc. However, only a few know about Authorize.Net. Authorize.Net ranks among the smartest, safest, and most comprehensive online payment gateways. With this payment gateway, businesses can perform online transactions using Paypal, debit cards, Apple Pay, Visa Checkout, etc.
Here’s a look at some of the perks of having Woocommerce authorize.net.
Easy Configuration
One of the main reasons why you should integrate Authorize.Net on your Woocommerce store is because it’s pretty easy to integrate. From this guide, you can see that it’s only a simple three-step process to set up the payment gateway. Therefore, you shouldn’t get discouraged thinking that the integration process is technical.
Saving Payment Methods
Customers will want to take advantage of the saving payment methods feature when you integrate your Woocommerce store with Authorize.Net. Online shopping experience is all about convenience. Your customers want to shop conveniently, and one way to do so is by having an easy checkout process.
Authorize.Net ensures your clients can fill out their payment details in seconds and proceed to checkout their carts. The payment gateway also ensures your online store supports subscriptions and pre-orders.
Customers will also find it easy to manage their saved payment methods. They can add or remove payment methods depending on their shopping preferences.
Enhanced Checkout Form
Integrating Authorize.Net on your Woocommernce also guarantees that your customers can take advantage of the enhanced checkout experience on their handheld and desktop devices. For instance, customers can get automatic refunds from WooCommerce without necessarily logging into their control panel.
Conclusion
You need to set up Woocommerce authorize.net to run a successful and profitable business online. Millions of online shoppers are always on the lookout for convenient ways to shop. The best way to ensure your clients enjoy a seamless shopping experience is by ensuring Authorize.Net works on your Woocommerce platform.
After all, you want to provide an extra layer of security and win over your clients’ trust during the checkout process. So, make a smart move by using this guide to set up authorize.net on your store.